Our app doesn't collects any data whatsoever.
Sunday, August 30, 2020
Sunday, August 21, 2016
Catch Rare Pokemon in Pokemon Go Android without Root.
So here is my another post but this one is for currently tending game "Pokemon GO". Probably you know this and that is why you are here.
There are various hacks available for android as well as iOS which make your character move to any place like walking without even having you leave your room.
I should say that iOS hack of Pokemon Go is fairly very easy then it is of android.
But we are not here to discuss the iOS hack but rather android hack.
So before I begin, you should know, that this will only work on Marshmallow or above devices. this will not work on either lollipop or any other lower version of android.
Things you need to do the tricks:
1. Pokemon GO app itself.
2. Fly GPS app (available on Play Store)
3. Google Maps
4. A web browser preferably on PC.
For configuring the Fly GPS app, just follow these steps. If you already are familiar with the app, skip this part.
1. First install Fly GPS app from play store.
https://play.google.com/store/apps/details?id=com.fly.gps&hl=en
2. Now go to your phone setting, then go to:
Settings>>About>>Software Information>>Build Number

3. Keep tapping Build Number until it says you are a developer.
4. Now go back to Settings and Open Developer Options.
Go to Developer Options>> Select Mock Location App>> Select Fly GPS

Now, follow the steps carefully or else you will get soft banned. There is a little trick here not to get soft banned so read it carefully.
1.
Install all the apps and open your web browser.
Go to Pokesnipers.com
This website is gonna show you co-ordinates of all the rare Pokemon in the world. Lapras, Dragonite,.. everyone is here.
2.
Now enable your location and open Fly GPS app. Click on your location and click "Please select the Menu". A menu will pop up. Select "Add as Favorite". Type any name and click Add. Now Check you Favorites, your saved location will be visible.
 Also Click on your saved location. Click Run and then click "Joystick Location Mode -(Pokemon)"
This will bring a joystick on your screen which you can use to move your character.
Also it will bring a FlyGPS app icon on your screen.
Basically what it does that, where you select to run the service, this app will spoof your GPS location to that place. So if you select new york as you spoofed location, your phone GPS will think that you are in New York. But I will recommend you to use your home location as you wont get soft banned.


There are various hacks available for android as well as iOS which make your character move to any place like walking without even having you leave your room.
I should say that iOS hack of Pokemon Go is fairly very easy then it is of android.
But we are not here to discuss the iOS hack but rather android hack.
So before I begin, you should know, that this will only work on Marshmallow or above devices. this will not work on either lollipop or any other lower version of android.
Things you need to do the tricks:
1. Pokemon GO app itself.
2. Fly GPS app (available on Play Store)
3. Google Maps
4. A web browser preferably on PC.
For configuring the Fly GPS app, just follow these steps. If you already are familiar with the app, skip this part.
1. First install Fly GPS app from play store.
https://play.google.com/store/apps/details?id=com.fly.gps&hl=en
2. Now go to your phone setting, then go to:
Settings>>About>>Software Information>>Build Number

3. Keep tapping Build Number until it says you are a developer.
4. Now go back to Settings and Open Developer Options.
Go to Developer Options>> Select Mock Location App>> Select Fly GPS

1.
Install all the apps and open your web browser.
Go to Pokesnipers.com
This website is gonna show you co-ordinates of all the rare Pokemon in the world. Lapras, Dragonite,.. everyone is here.
2.
Now enable your location and open Fly GPS app. Click on your location and click "Please select the Menu". A menu will pop up. Select "Add as Favorite". Type any name and click Add. Now Check you Favorites, your saved location will be visible.

This will bring a joystick on your screen which you can use to move your character.
Also it will bring a FlyGPS app icon on your screen.
Basically what it does that, where you select to run the service, this app will spoof your GPS location to that place. So if you select new york as you spoofed location, your phone GPS will think that you are in New York. But I will recommend you to use your home location as you wont get soft banned.
3.
Now open up and PokeMon Go app and let it start. Now Minimize it. This tells Pokemon Go that you are here.
4.
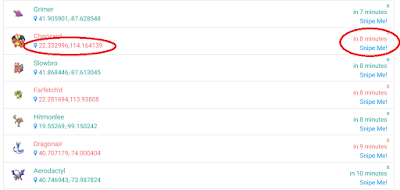
Now open the website Pokesnipers.com
You will be looking at various Pokemons and their spawn co-ordinates. On the right, you will see the time after which they will De-Spawn. So select any Pokemon which has a good time before they Despawn like 5-6 minutes.

5.
Open up Google Map on your phone.
Click Search and enter the co-ordinates and click search. It will take you to exact co-ordinates.
Here we will take example as Charizard. He's a badass right?

6.
Now here comes the difficult part. You need to match you location to the pokemon location. Zoom out google maps to see which country you are in and open Fly GPS app to spoof you location to that country. Keep opening google maps and see which direction you need to go and then again open Fly GPS app and select to run spoofing service there. Do this until you are very close to your Charizard location. Now When you are very close, use your joystick to move to the exact location of Charizard.
7.
Now open up Pokemon Go app. You will be at the spoofed location. Wait for few seconds and the Charizard will spawn. Do not use you Joy stick, at all. Just wait for him to spawn.

8.
Now here comes the important part which is gonna save you from being soft banned.
Once you click on the charizard and it comes to your screen. Click on the Fly GPS icon. It will take you to the app. Go to favourites. Click on Home>>Run>> Joystick Location Mode -(Pokemon)
What this will do that, it will make Pokemon GO think that you haven't moved to any location, and you are still there. If you don't do this and you throw a ball, you will surely and instantly get soft banned.
9.
Once you have click on that, Pokemon Go app will automatically open. Now go catch that Charizard. Mine was 1128 CP. Yay.
Good Luck Catching all of them.
Wednesday, August 10, 2016
Upgrade Zenfone Selfie to Marshmallow. [Through official update]
So Asus launched marshmallow update for Asus Zenfone selfie and brought the latest android update to us Zenfone selfie users.
I will skip the part where I tell what this upgrade brings and what is new in it. For that refer something else. I'm here to tell you how to upgrade. But yeah I can tell you one thing, this is an awesome update. It solves the battery issue because because of Android's new Doze mode.
Before, in the Lollipop, if I charged my phone to 100% before going to sleep, I would wake in the morning and find that already 7-8% of my battery has already drained (In 6 hours of sleep). But now ever since I update my phone, I did some testing. I charged my phone to 5% before going to sleep. When I woke up, guess what.. It was still at 5%. Great right. And there are many other improvements.
Sorry for no screenshots, as I already updated my phone to Marshmallow and can not show the process again. I made sure that the process I write is detailed and easy so you wont need screenshots.
So you are here because they are not giving this update directly from software update from the phone itself. I don't know why they did that. But since they didn't gave FOTA (Firmware other the Air) on the phone but on website, it confuses how to do it.
I tried installing it though adb, the method which everyone finds on the internet. But it didn't worked. It showed "Cannot read update.zip" error. So if you are stuck like that, follow this procedure and it will work.
If you don't know what the above line means, that is alright.. just follow me.
Before you begin:
1.Make sure you update you phone to WW_1.15.40.1582. For doing that, you just need to open software update in settings and check for updates.
Go to Settings>>About>>Software Information. Under Build Number, you will find your numbers.
Make sure it is WW_1.15.40.1582.
2. Another thing you want to make sure that you have 2 to 3 GB free space on your phone memory. You can use and external SD card also.
3.The marshmallow update doesn't supports App2SD, so all the apps that are in your SD card will be removed. SO before you begin, make sure to move all your apps from SD card to your phone. (Blog update 21-Aug-2016)
4.Also backup all you data in case something goes wrong (Probably it won't).
Now, when you have done and checked all the above, Follow these:
1.
So First,
You need to download the marshmallow upgrade file from the Asus website.
Here is the direct link:
Download Zenfone Selfie Marshmallow Direct Link.
If the above link doesn't works, you can click this link to open Asus website
http://www.asus.com/in/Phone/ZenFone_Selfie_ZD551KL/HelpDesk_Download
Go to drivers and tools, and select OS "Android"
Scroll down to find the upgrade file. It is named Version WW_21.40.0.169.
Download that 1.63GB zip file. Doesn't matter where you download it, on PC or phone.
2.
Once you have downloaded the file, make sure your phone is charged at least 40-50% as it takes time to upgrade. You don't want to switch off the phone while it is being upgraded as it may Brick your phone. (Which by the way means that your phone becomes useless and only people at service center can repair your phone.)
3.
Now copy the zip while as it is "without extracting" to your phone.
Not anywhere, In ASUS folder of your phone memory.
(If it doesn't contains ASUS folder, which is unlikely, create it.)
If you are using external SD card, make ASUS folder in the SD card and copy it to that folder.
[Blog Update 27/08: Even if you copy the zip to phone memory, it will show you the update. Thankyou ANIKESH008 for confirming this.]
If you don't copy it to correct folder, it will not show upgrade option. There is no danger if you copy it to wrong location. If you have question, please write it in comments.
4.
Now once you copied the file, switch off you phone and start it again. Once the phone has booted up, completely, it will show "Update Found" in notification bar. Just click it, and it will start the update.
Follow any onscreen instructions and let it do its work. It will take some time to update so make sure your phone is charged. You can plug into the charger also just to be on safe side.
And done. Your phone is now updated to Latest android.
Have any question, please feel free to write in comments.
I will skip the part where I tell what this upgrade brings and what is new in it. For that refer something else. I'm here to tell you how to upgrade. But yeah I can tell you one thing, this is an awesome update. It solves the battery issue because because of Android's new Doze mode.
Before, in the Lollipop, if I charged my phone to 100% before going to sleep, I would wake in the morning and find that already 7-8% of my battery has already drained (In 6 hours of sleep). But now ever since I update my phone, I did some testing. I charged my phone to 5% before going to sleep. When I woke up, guess what.. It was still at 5%. Great right. And there are many other improvements.
Sorry for no screenshots, as I already updated my phone to Marshmallow and can not show the process again. I made sure that the process I write is detailed and easy so you wont need screenshots.
So you are here because they are not giving this update directly from software update from the phone itself. I don't know why they did that. But since they didn't gave FOTA (Firmware other the Air) on the phone but on website, it confuses how to do it.
I tried installing it though adb, the method which everyone finds on the internet. But it didn't worked. It showed "Cannot read update.zip" error. So if you are stuck like that, follow this procedure and it will work.
If you don't know what the above line means, that is alright.. just follow me.
Before you begin:
1.Make sure you update you phone to WW_1.15.40.1582. For doing that, you just need to open software update in settings and check for updates.
For those who don't know what the above number is, it is the version of software provided by the Asus for the Selfie phone. It you think that why this number is used to define the software version and why not Android version 5.0 or 5.1. It is because, every Company like Asus need to modify the android package so that their android is a bit different than the others. So they take the android provided by the Google (Owner of android) and modify it up to their needs. Every android ROM need to be modify for every phone. One ROM cannot run on any other device for which it is not made.Continuing on our topic, If you want to check that you are at correct version,
Go to Settings>>About>>Software Information. Under Build Number, you will find your numbers.
Make sure it is WW_1.15.40.1582.
2. Another thing you want to make sure that you have 2 to 3 GB free space on your phone memory. You can use and external SD card also.
3.The marshmallow update doesn't supports App2SD, so all the apps that are in your SD card will be removed. SO before you begin, make sure to move all your apps from SD card to your phone. (Blog update 21-Aug-2016)
4.Also backup all you data in case something goes wrong (Probably it won't).
Now, when you have done and checked all the above, Follow these:
1.
So First,
You need to download the marshmallow upgrade file from the Asus website.
Here is the direct link:
Download Zenfone Selfie Marshmallow Direct Link.
If the above link doesn't works, you can click this link to open Asus website
http://www.asus.com/in/Phone/ZenFone_Selfie_ZD551KL/HelpDesk_Download
Go to drivers and tools, and select OS "Android"
Scroll down to find the upgrade file. It is named Version WW_21.40.0.169.
Download that 1.63GB zip file. Doesn't matter where you download it, on PC or phone.
2.
Once you have downloaded the file, make sure your phone is charged at least 40-50% as it takes time to upgrade. You don't want to switch off the phone while it is being upgraded as it may Brick your phone. (Which by the way means that your phone becomes useless and only people at service center can repair your phone.)
3.
Now copy the zip while as it is "without extracting" to your phone.
Not anywhere, In ASUS folder of your phone memory.
(If it doesn't contains ASUS folder, which is unlikely, create it.)
If you are using external SD card, make ASUS folder in the SD card and copy it to that folder.
[Blog Update 27/08: Even if you copy the zip to phone memory, it will show you the update. Thankyou ANIKESH008 for confirming this.]
4.
Now once you copied the file, switch off you phone and start it again. Once the phone has booted up, completely, it will show "Update Found" in notification bar. Just click it, and it will start the update.
Follow any onscreen instructions and let it do its work. It will take some time to update so make sure your phone is charged. You can plug into the charger also just to be on safe side.
And done. Your phone is now updated to Latest android.
Have any question, please feel free to write in comments.
Saturday, June 11, 2016
Stream or Play a video directly without downloading from Torrent.
You have got a High Speed connection and you watch movies a lot. For that you start download from torrent and wait for the movie to finish downloading. Have you ever thought how much time you are wasting while waiting the movie to finish downloading? What if I tell you that you can watch that movie without any wait and without downloading it? It would be cool right?
Moreover, the movie you thought would be in good print reveals itself to be in a shitty format, maybe recorded by a camera, etc. So here I am to tell you how to stream a video in torrent without downloading it. With it you will be able to watch movie without any wait and without any download.
Now, there are hundreds of software that let you stream or play videos directly from torrent. But I'm going to show you how to make it work with softwares you probably already have.
1. Maybe a torrent of a movie or any video.
2. uTorrent Software (or any other torrent downloading software like BitTorrent, etc. uTorrent is small compact, so I would recommend it.)
3. VLC media player (or any other media playing software which allows network streaming.)
These two softwares are very popular and everybody almost have it. If you use another torrent software, it must have the streaming capability too. If you have another media player, be sure to check that if it contains network streaming or anything like that.
So the process is very simple. I would tell you very simply with Images.
So when you have added the torrent, I need you to select that torrent.
When you have selected it, go to the files tab in the bottom. Here you will see the bunch of files you are downloading.

After that right-click on the movie file. Not anything else, but the movie file. It will be a video file with .mkv .mp4 .mov or any other video extension.
Now click on "Copy stream URL".

Now you have copied the URL through which you can stream this video.
 For doing this, I need you to Open VLC media player.
Now on the top-left portion, click on the "Media" menu. Click it and you will see an option of "Open Network Stream". Click it.
Or you can press Ctrl+N for a shortcut.
 Now in the network stream window, right click and paste the URL and click play.
There you go, your video will start playing online. You can add subtitles like any other movie by downloading it from internet.
Also, there is no need to download the movie for watching it. You can stop the Torrent or close uTorrent. The video will still play.
Cool Right?
Now next time you want to are in a hurry to watch any movie and you don't want to wait, streaming it online would be a good idea.
Also if you want to check the quality of the movie before downloading it and wasting your precious data, you can stream it online to check its quality.
Cheers. :)
Moreover, the movie you thought would be in good print reveals itself to be in a shitty format, maybe recorded by a camera, etc. So here I am to tell you how to stream a video in torrent without downloading it. With it you will be able to watch movie without any wait and without any download.
Now, there are hundreds of software that let you stream or play videos directly from torrent. But I'm going to show you how to make it work with softwares you probably already have.
Things you need:
For this you will need three things:1. Maybe a torrent of a movie or any video.
2. uTorrent Software (or any other torrent downloading software like BitTorrent, etc. uTorrent is small compact, so I would recommend it.)
3. VLC media player (or any other media playing software which allows network streaming.)
These two softwares are very popular and everybody almost have it. If you use another torrent software, it must have the streaming capability too. If you have another media player, be sure to check that if it contains network streaming or anything like that.
So the process is very simple. I would tell you very simply with Images.
Process:
First you need a torrent file for the movie. If you are new to this, and you don't know stuff about downloading movies from torrent, wait for some time and I will publish a blog on it.So when you have added the torrent, I need you to select that torrent.

When you have selected it, go to the files tab in the bottom. Here you will see the bunch of files you are downloading.

After that right-click on the movie file. Not anything else, but the movie file. It will be a video file with .mkv .mp4 .mov or any other video extension.
Now click on "Copy stream URL".

Now you have copied the URL through which you can stream this video.

Now on the top-left portion, click on the "Media" menu. Click it and you will see an option of "Open Network Stream". Click it.
Or you can press Ctrl+N for a shortcut.

There you go, your video will start playing online. You can add subtitles like any other movie by downloading it from internet.
Also, there is no need to download the movie for watching it. You can stop the Torrent or close uTorrent. The video will still play.
Cool Right?
Now next time you want to are in a hurry to watch any movie and you don't want to wait, streaming it online would be a good idea.
Also if you want to check the quality of the movie before downloading it and wasting your precious data, you can stream it online to check its quality.
Cheers. :)
Friday, May 27, 2016
Using Manual Mode in Android Camera.
So many of the new android phones have manual mode in camera and it is very important to know how this mode works. With it you will be able to take control of your photos, how they look and define what you want to take in photos.
"Manual mode brings in DSLR level control to our photos."
Many small budget phones now have manual camera such as Zenfone Selfie, Zenfone Laser, Moto G4, and various others. So check that your phone has manual mode in its camera. If it has, you are about to have a new perspective of your phone camera.
So you are gonna learn here about using manual mode in you camera.
So you are gonna learn here about using manual mode in you camera.
Let us begin. First of all you must know a few basic things in camera. These are:
- ISO
- Aperture
- Exposure Time

............................................................................................................................................
ISO is not any abbreviation but it only defines sensitivity of the camera sensor towards light. The more the ISO, more is your camera sensitive towards light. What that means if you are in low light conditions, you should raise your ISO so your sensor will be more sensitive to light and your sensor can read information in little light.
So key points in using ISO:

Higher ISO:
- When Using in low light.
Lower ISO:
- When in Dim Light.
"Noise is generation of fine grains in the photo."
............................................................................................................................................
Aperture is the lens opening in the camera. It defines how much your background will blur. We can't change aperture in phone camera, so let's skip this.
............................................................................................................................................
Exposure Time is the amount of time your camera gathers light. The more the shutter speed, the more the light it will gather. So if you have lots of light such as in bright sunlight, you need to decrease your Exposure Time, otherwise the camera will gather more light and your photo will be white. But if you are in low light condition, you need to increase your exposure time.
Also the smaller the exposure time, the faster the image will get captured, hence less motion blur. In longer exposure shots, the moving objects will get blurry or completely vanish. So motion is the enemy of long exposure shots.
So key points in using exposure time:
Smaller Exposure time:
- When lots of light is available.
- When you want to freeze the motion and doesn't want to cause motion blur.
- Doesn't requires steady hand.
Longer Exposure Time:
- In dim light conditions.
- Needs a steady hand.
- When you are not shooting moving objects.
............................................................................................................................................
When you have understood the above things, there are two more things in manual mode of the camera.
These are 1) Focus and 2) White Balance
Focus:
It defines which object will be in focus(sharp) and which objects will be out of focus (blurred).
It defines which object will be in focus(sharp) and which objects will be out of focus (blurred).
Focus is generally given as slider in phones as here in my zenfone selfie. When you move the slider up, you focus on distant object while blurring object in the front. When you move it downwards, it will focus nearer object and blur out the farther objects. So you can adjust the slider accordingly.
However, this is required only when you are taking special closeup shots, or you know what to do. Generally, tap to focus works fine for normal shots.
 |
| Closer focus(Left), Farther Focus(Right) |
White Balance:
The white balance corrects the colour of light or say temperature of the light. You must have noticed that your photos are sometimes very yellowish or very bluish. This is because the type of light around you. In some phones, it is given as slider for Kelvin scale as in this screenshot. In some, it is given as just a slider or predefined modes of white balance such as cloudy, florescent, etc.
The white balance corrects the colour of light or say temperature of the light. You must have noticed that your photos are sometimes very yellowish or very bluish. This is because the type of light around you. In some phones, it is given as slider for Kelvin scale as in this screenshot. In some, it is given as just a slider or predefined modes of white balance such as cloudy, florescent, etc.

............................................................................................................................................
When you have learned all the controls of the manual mode, you need to learn to implement them. So I will give you various conditions and give you instructions about what settings to use.
Before that remember two things:
1. The lower the ISO you use, the better will be your photos.
2. Under dim light conditions, increase your exposure time rather than raising your ISO. However, for using long exposure time, you need to use firm base such as a tripod otherwise your photos will get a lot of motion blur.
I will give you Instructions soon in upcoming posts about a simple phone stand which you can use to take long exposure shot, which I have used to take photos in the examples in the blog.
Condition 1:
So the first condition is dark environment.
 Here is an extreme example of photo in dark environment.
It was too dark, so for the example, I took a shot in automode, without flash.
The photo was took at:
ISO 1540
Exposure time: 1/8 sec.
Notice the amount of noise?
And Barely anything is visible.
 So I took another shot in manual mode.
This I took at
ISO 50
Exposure Time: 16" (Double quotes denote sec. So 16sec.)
Without Flash.
See the clarity?
And the Noise is totally absent.
 I took another shot while still in manual mode, but this time, increasing the exposure time to 32 sec.
So the config were:
ISO 50
Exposure time: 32"
Without Flash.
See the magic?
But I must tell you, all these photos were taken while my phone was resting on a firm base.
I used a 2 sec timer, so that my camera doesn't shakes, while taking photos, otherwise there would have been motion blur.
Condition 2:
When you are in sunlight and you want to shoot moving object without blur.
If you are in sunlight, always decrease your ISO to minimum.
Shoot at least exposure time as possible. That means lower it upto you photo remains enough bright.
Small exposure time tends to freeze the motion, as your camera sensor will quickly take all the information in few millisecond. So motion blur won't be caused.
Condition 3:
When you want to capture motion of the object.
For this, first rule first, lower the ISO to its least level possible.
Don't decrease the shutter speed too much otherwise the moving object will freeze. Simply select a value which keep the subject lightened up but also has some motion blur. This way you can show a great motion in your photos.
So these are various conditions in which you can use manual mode in android camera to take great photos. Also keep experimenting through camera and be creative. If you have any other thing you wanna tell, please do write it in comments.
Please leave a feedback about the blog. What you understood and what you didn't. I would love to help you guys.
Thanks.
Tuesday, May 24, 2016
Complete camera review: Asus Zenfone Selfie
So I'm publishing this blog not because I want to be a blogger or reviewer or anything like that..(maybe in the future i would like that).. it is because I have this phone and would like to write about it.
So I got this phone on 15 May 2016.
I have 32GB model with 3GB RAM.
This blog is about camera performance of the phone and all modes and performance of manual mode.
So without wasting any of your valuable time, let's begin.


What you must notice in these photos are the level of details. Far shots are very good too but close up shots are just amazing.
Asus has pixelmaster 2.0 technology camera, and it comes with different modes.
 These are:
Among all these I find manual camera to be most interesting. HDR mode is also good, but the rest are of no use in long term. (Not talking about auto mode.)So I got this phone on 15 May 2016.
I have 32GB model with 3GB RAM.
This blog is about camera performance of the phone and all modes and performance of manual mode.
So without wasting any of your valuable time, let's begin.
REAR CAMERA:
The camera is 13MP with f/2.0 and dual toned flash. The camera is pretty awesome. It takes very awesome photos. However there is some noise is low light conditions. I will show you how to remove noise using manual camera mode int it. Just stay tuned. Here are some sample shots.


What you must notice in these photos are the level of details. Far shots are very good too but close up shots are just amazing.
Asus has pixelmaster 2.0 technology camera, and it comes with different modes.

- Auto Mode
- Manual
- HDR
- Beautification
- Super Resolution
- QR Code
- Low Light
- Night
- Depth of field
- Effect
- GIF Animation
- Panaroma
- Miniature
- Time Rewind
- Smart Remove
- All Smiles
- Slow Motion
- Time Lapse
- Panosphere
I will talk about performance of the manual camera, first let me cover up all other modes.
HDR is pretty decent but everybody who knows how HDR works must already know that you need to eliminate the shake to take a good HDR mode picture.
(To know more about HDR photography in phone, stay tuned with the blog.)
Beautification Mode is also good. It give you various unique options like chin thinning, eye size increase, blush, skin color, etc.
Super Resolution mode take many photos at a time and combines them to make a big super resolution photograph. The details get incresed in the photo, so is the photo size.
Low light has unique techonolgy of combining multiple pixels to give you photos in extremely low light, but that drops your photos to 3M resolution, so it is prestty useless.
Depth of field give you option to blur the background behind your subject inn photo but it is not what you expect. doesn't do its job well.
Panaroma is already you know.
Miniature is good at the beginning but you fill find it useless most of the time as most of the editing in photo can be done afterwords.
Time Rewind is useless too, you will never use it. It gives you the option to take multiple burst shot and deciding which photo is good. pretty useless if you know what you are shooting.
Slow motion of this phone is not good. It is like taking multiple photos and combining them to view a slideshow. By the way, slow motion is expected to be good in those phones only which can record 60fps videos or more. this phone records only 30fps which is good for normal videos but not good for slow motion.
Time Lapse is good in everyphone.
Panosphere was awesome, but it is not able to record details as we would expect. Photos are overlapped at each other. I thought it would give panorama like effect like combining photos at detailed level, but it was not upto the mark. So useless it is too.
Manual Camera Mode:
So let us come to manual camera mode.
If you want to know how to take good photos in manual mode of your camera, here is my another post on
Using Manual mode in your android camera.
Here i will talk about the performace of the manual mode.
Now here are some shots taken in auto mode and manual mode.


And the camera allows you to take up shots up to 32sec exposure. So you can get pretty decent photos even in the candle light. Just you need are a still hands. I use a self made tripod to take photos of long exposure. It is not a tripod actually, just a stand for my phone, cause shaking camera even a little bit in long exposure shots will surely ruin your photo.
I will post a blog on how to make it, just stay tuned.
One thing more. The lowest ISO on this phone is ISO50, which is pretty good. Most phones only give you option on shooting in minimum ISO100, so its a bonus.
So if you want to take good photos in manual mode, some tips are:
1. Use ISO50, the minimum. It will give you best details, and least noise.
2. Keep practicing on what exposure time you should use to best take your photos. More the light, less exposure time, lesser the light, more exposure time. But make your you use a firm base for you phone when taking shot with long exposure, cause even a little shake will ruin your photograph.
Video Recording in phone is upto 1080p. It is also very good. Videos can also be shot in manual mode. so you can adjust focus and white balance and ISO too while recording. So it is pretty good.
Oh, I almost forgot to write about the front camera.
FRONT CAMERA
So the front camera is of 13MP f/2.2 with a dual tones flash. Awesome isn't it?
The camera takes up pretty good photo. Awesome selfies, if you are selfie lover.
The front camera has slightly different options.

Various options are like rear camera, except:
Selfie panaroma which is just like panaroma but covering short distance for taking selfie of a large group of people.
Manual mode in front camera gives you maximum exposure time of 0.5 second. Nothing to worry as for long exposure shots, back camera is better.
So this was a complete review of the Asus Zenfone Selfie. It has pretty good camera, and if you want a phone with good camera, this is an amazing phone.
If you have any doubt or question or anything you wanna say, just ask in comments. I will love to hear from you people.
Subscribe to:
Comments (Atom)