So here is my another post but this one is for currently tending game "Pokemon GO". Probably you know this and that is why you are here.
There are various hacks available for android as well as iOS which make your character move to any place like walking without even having you leave your room.
I should say that iOS hack of Pokemon Go is fairly very easy then it is of android.
But we are not here to discuss the iOS hack but rather android hack.
So before I begin, you should know, that this will only work on Marshmallow or above devices. this will not work on either lollipop or any other lower version of android.
Things you need to do the tricks:
1. Pokemon GO app itself.
2. Fly GPS app (available on Play Store)
3. Google Maps
4. A web browser preferably on PC.
For configuring the Fly GPS app, just follow these steps. If you already are familiar with the app, skip this part.
1. First install Fly GPS app from play store.
https://play.google.com/store/apps/details?id=com.fly.gps&hl=en
2. Now go to your phone setting, then go to:
Settings>>About>>Software Information>>Build Number

3. Keep tapping Build Number until it says you are a developer.
4. Now go back to Settings and Open Developer Options.
Go to Developer Options>> Select Mock Location App>> Select Fly GPS

Now, follow the steps carefully or else you will get soft banned. There is a little trick here not to get soft banned so read it carefully.
1.
Install all the apps and open your web browser.
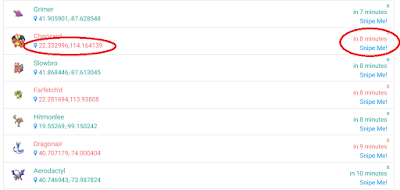
Go to Pokesnipers.com
This website is gonna show you co-ordinates of all the rare Pokemon in the world. Lapras, Dragonite,.. everyone is here.
2.
Now enable your location and open Fly GPS app. Click on your location and click "Please select the Menu". A menu will pop up. Select "Add as Favorite". Type any name and click Add. Now Check you Favorites, your saved location will be visible.
 Also Click on your saved location. Click Run and then click "Joystick Location Mode -(Pokemon)"
This will bring a joystick on your screen which you can use to move your character.
Also it will bring a FlyGPS app icon on your screen.
Basically what it does that, where you select to run the service, this app will spoof your GPS location to that place. So if you select new york as you spoofed location, your phone GPS will think that you are in New York. But I will recommend you to use your home location as you wont get soft banned.


There are various hacks available for android as well as iOS which make your character move to any place like walking without even having you leave your room.
I should say that iOS hack of Pokemon Go is fairly very easy then it is of android.
But we are not here to discuss the iOS hack but rather android hack.
So before I begin, you should know, that this will only work on Marshmallow or above devices. this will not work on either lollipop or any other lower version of android.
Things you need to do the tricks:
1. Pokemon GO app itself.
2. Fly GPS app (available on Play Store)
3. Google Maps
4. A web browser preferably on PC.
For configuring the Fly GPS app, just follow these steps. If you already are familiar with the app, skip this part.
1. First install Fly GPS app from play store.
https://play.google.com/store/apps/details?id=com.fly.gps&hl=en
2. Now go to your phone setting, then go to:
Settings>>About>>Software Information>>Build Number

3. Keep tapping Build Number until it says you are a developer.
4. Now go back to Settings and Open Developer Options.
Go to Developer Options>> Select Mock Location App>> Select Fly GPS

1.
Install all the apps and open your web browser.
Go to Pokesnipers.com
This website is gonna show you co-ordinates of all the rare Pokemon in the world. Lapras, Dragonite,.. everyone is here.
2.
Now enable your location and open Fly GPS app. Click on your location and click "Please select the Menu". A menu will pop up. Select "Add as Favorite". Type any name and click Add. Now Check you Favorites, your saved location will be visible.

This will bring a joystick on your screen which you can use to move your character.
Also it will bring a FlyGPS app icon on your screen.
Basically what it does that, where you select to run the service, this app will spoof your GPS location to that place. So if you select new york as you spoofed location, your phone GPS will think that you are in New York. But I will recommend you to use your home location as you wont get soft banned.
3.
Now open up and PokeMon Go app and let it start. Now Minimize it. This tells Pokemon Go that you are here.
4.
Now open the website Pokesnipers.com
You will be looking at various Pokemons and their spawn co-ordinates. On the right, you will see the time after which they will De-Spawn. So select any Pokemon which has a good time before they Despawn like 5-6 minutes.

5.
Open up Google Map on your phone.
Click Search and enter the co-ordinates and click search. It will take you to exact co-ordinates.
Here we will take example as Charizard. He's a badass right?

6.
Now here comes the difficult part. You need to match you location to the pokemon location. Zoom out google maps to see which country you are in and open Fly GPS app to spoof you location to that country. Keep opening google maps and see which direction you need to go and then again open Fly GPS app and select to run spoofing service there. Do this until you are very close to your Charizard location. Now When you are very close, use your joystick to move to the exact location of Charizard.
7.
Now open up Pokemon Go app. You will be at the spoofed location. Wait for few seconds and the Charizard will spawn. Do not use you Joy stick, at all. Just wait for him to spawn.

8.
Now here comes the important part which is gonna save you from being soft banned.
Once you click on the charizard and it comes to your screen. Click on the Fly GPS icon. It will take you to the app. Go to favourites. Click on Home>>Run>> Joystick Location Mode -(Pokemon)
What this will do that, it will make Pokemon GO think that you haven't moved to any location, and you are still there. If you don't do this and you throw a ball, you will surely and instantly get soft banned.
9.
Once you have click on that, Pokemon Go app will automatically open. Now go catch that Charizard. Mine was 1128 CP. Yay.
Good Luck Catching all of them.